PC Slower Than It Used to Be?
A free scan shows the junk files, broken settings and background clutter dragging Windows down - then fixes them in one click.Free scan · Windows 10 & 11Outdated Drivers Are Slowing You Down
One free scan finds every outdated or missing driver and matches the right update for your exact hardware.Free scan · exact hardware matchDim headlights can come from cloudy lenses, a failed or incorrect bulb, an electrical problem, or beams aimed away from the road. Start by checking whether the lens is hazy, whether one or both lamps are affected, and whether the beams point correctly; match the fix to the cause rather than replacing parts by guesswork. A restoration kit is relevant to exterior lens haze, but it will not repair a bulb, electrical fault, damaged assembly, or poor aim.
Why headlights look dim
Useful illumination depends on more than the bulb. The headlamp’s optics, the vehicle’s electrical system, and beam aim all affect how much light reaches the road. A cloudy lens may scatter or block light; a failed or unsuitable bulb can reduce output; an electrical fault can affect lamp operation; and mis-aim can send light away from the road or toward other drivers. Those causes can look similar from the driver’s seat, so a dim beam is a symptom, not a diagnosis.
As an Amazon Associate I earn from qualifying purchases.
Before buying parts, separate the questions: Is the lens visibly cloudy? Is one lamp affected or are both? Is a lamp out or flickering? Does the beam seem pointed too low, or does it scatter light into other drivers’ eyes? Those observations help determine whether to clean, restore, replace a bulb or assembly, or seek diagnosis and aim inspection. They do not, on their own, prove which component has failed.
What’s actually slowing this PC down?
Pick the symptom - the matching free tool is one click away.
Cloudy or yellowed lens
Sunlight can degrade the protective coating on a plastic headlamp lens. Check the outside surface for haze, yellowing, or cloudiness. Lens deterioration reduces output and can worsen nighttime visibility. Dirt on the outside can also make a lens look dull, which is why it is useful to clean it before deciding that the plastic itself needs restoration.
#1 Best Overall

- KIT CONTENTS: Each headlight restoration kit includes (8) Step 1 Oxidation Removing Wipes, (1) Step 2 Sanding Kit, and (2) Step 3 Ceramic Coating Wipes
- LONG-LASTING CERAMIC COATING: This is a CERAMIC coating for cars that chemically bonds to your headlights and provides UV protection for as long as you'll own your vehicle
- NO POWER TOOLS REQUIRED: Everything is included in the kit for your car. There are no tools required that could potentially damage your headlights or paint
- RESTORES AND PROTECTS FROM UV: Our CERAMIC coating wipes provide a layer of UV protection that will last as long as you own your vehicle
- 3 EASY STEPS: Cerakote's Headlight Restoration Kit is a simple, 30 minute process. Step 1: Our Oxidation Remover wipes remove stubborn oxidation. Step 2: Using our supplied sanding materials, remove any remaining deep oxidation. Step 3: Cerakote's industry leading ceramic restores the headlight to like-new
The possible effect is not merely cosmetic. AAA’s 2017 lens-deterioration report found that the tested halogen reflector headlamps, even in almost-new condition, provided adequate lighting on unlit roads only for nighttime driving speeds up to 39 mph. That is a result for the tested lamps, not a general speed recommendation for every car or a prediction for every hazy headlamp. It illustrates why deteriorated optics deserve attention rather than being dismissed as appearance alone.
Bulb problem
A lamp that is out, or a bulb confirmed to have failed, calls for the vehicle-specified replacement bulb. Check the owner’s manual for the correct specification and service instructions. A bulb that does not match the vehicle is not a safe shortcut to more light: headlamp design and fitment vary, and noncompliant upgrades can contribute to glare.
When just one lamp is affected, a bulb or lamp-specific issue is worth checking, but the difference does not establish the cause. If the bulb is replaced and the symptom remains, do not keep swapping bulbs by guesswork. The remaining issue may involve the assembly, electrical system, or aim, and may require vehicle-specific diagnosis.
Electrical fault
The vehicle’s electrical system is one factor in headlamp distance and lumen performance. Flickering, intermittent operation, or persistent dimness—especially when both lamps are affected—can indicate a problem that cleaning or a new bulb will not solve. These symptoms need vehicle-specific diagnosis rather than speculative parts replacement.
There is no single electrical explanation that can be inferred from the word “dim.” The useful next step is to tell a qualified technician exactly what you observed: whether one or both lamps are involved, whether they flicker or go out intermittently, and whether a simple confirmed repair changed anything. A particular electrical component cannot be identified without vehicle-specific diagnosis.
Rank #2

- KIT CONTENTS - Each headlight restoration kit includesOne bottle of headlight yellowing removal solution (6.09OZ), one bottle of headlight crystal plating solution (0.34OZ), one towel, and one sponge
- LASTS AS LONG AS YOU OWN YOUR VEHICLE! - This is a CERAMIC coating for cars that chemically bonds to your headlights and provides UV protection for as long as you'll own your vehicle.
- NO POWER TOOLS REQUIRED - Everything is included in the kit for your car. There are no tools required that could potentially damage your headlights or paint.
- QIFOR Headlight Cleaner Oxidized and Yellowed Finish: The headlamp restorationfluid is designed to provide a yellowed finish, helping to restore the original color and appearance of your headlamp
- How to Use: ① Spray the product onto the lampshade and wire with a rag.② Spray the headlightcoating onto the coatingsponge and wipe evenlyin a direction. ③Wait for natural drying
Beam aim or vehicle loading
Headlamp aim can change after a lamp replacement or when the vehicle is loaded. Beams aimed too low can leave the road poorly lit; beams aimed incorrectly can also produce glare. A lamp can therefore appear weak because useful light is directed away from the road, even when the concern is not simply the bulb or lens.
If the pattern looks wrong, the beams seem to point too low, or light scatters into other drivers’ eyes, have the aim checked. An aim inspection is especially appropriate after a headlamp repair or collision. Do not try to compensate for a questionable pattern by fitting a brighter, unverified bulb; aim and bulb fitment affect both useful illumination and glare.
Recommended Free Tools
How to narrow down the cause
- Clean and inspect both outer lenses. Remove ordinary dirt, then look again for haze, yellowing, roughness, or cloudiness on the outside surface. If the appearance clears with cleaning, reassess before considering restoration. Cleaning removes grime but does not repair a failed bulb, electrical fault, damaged housing, or incorrect aim.
- Compare the lamps. Note whether one lamp is out or dimmer than the other, or whether both appear weak. A single-lamp symptom makes a bulb or lamp-specific issue worth checking; dimness affecting both lamps or recurring after a simple repair merits broader diagnosis. This comparison helps direct an inspection; it does not establish a diagnosis by itself.
- Look for operation problems. Pay attention to flickering or intermittent operation, not only steady dimness. If a lamp works inconsistently, or the problem persists after a confirmed simple fix, cleaning or lens restoration alone is not an adequate explanation or remedy. Record the symptom and seek vehicle-specific electrical diagnosis.
- Observe the beam pattern safely. If the lamps work but seem to point too low or scatter light into other drivers’ eyes, seek an aim inspection. Aim should be checked, especially after replacement or collision; there is no universal home aiming procedure. Do not alter aim by guesswork or fit a brighter, unverified bulb to mask a poor pattern.
- Check the owner’s manual. Confirm the specified bulb and the vehicle’s service instructions before replacing a bulb. Procedures and parts differ by vehicle, so do not rely on a bulb that merely looks similar or assume a conversion is compatible.
- Choose the repair based on what you found. Lens haze points toward restoration; a confirmed failed bulb toward a correct replacement; damage or severe deterioration toward assembly replacement; and flickering, persistent uncertainty, or an aim concern toward a qualified technician. If more than one symptom is present, the fixes may need to address more than one cause.
Which fix fits the symptom?
| Confirmed issue | Appropriate next step | What it will not fix |
|---|---|---|
| Ordinary dirt on the lens | Clean the exterior and reassess the lens and beam. | A failed bulb, electrical fault, physical damage, or poor aim. |
| Hazy or yellowed exterior lens | Try a restoration kit or professional lens restoration; protect nearby paint when using abrasives and follow the product instructions. | Internal damage, a bad bulb, an electrical fault, or mis-aim. |
| Confirmed failed bulb | Install the bulb type specified for the vehicle, following the manual. | Lens deterioration, electrical trouble, or an aim problem. |
| Cracked or severely deteriorated assembly, or a lens still rough or cloudy after restoration | Consider replacing the headlamp assembly and checking aim after installation. | A separate vehicle electrical fault. |
| Flickering, intermittent operation, uncertain cause, or incorrect beam direction | Arrange vehicle-specific electrical diagnosis or professional aiming, as appropriate. | There is no reliable one-size-fits-all parts replacement without diagnosis. |
There is no universal best fix or established cost that applies to every car. The appropriate choice depends on the confirmed cause, lens condition and severity, vehicle fitment, labor, likely improvement, and whether the beams need adjustment. A restoration kit is a product for a particular symptom—exterior haze—not a general dim-headlight solution. A vehicle-specific bulb or replacement assembly is a conditional choice only after fitment and cause are established.
Can headlight restoration make a difference?
Restoration can improve a cloudy exterior lens, but it may not bring light output back to that of a new assembly. AAA’s 2018 evaluation, which used an accredited testing laboratory and FMVSS-108 procedures, found that the cloudy headlamps in its test produced about 20% of the light output of new headlamps; replacement improved tested output more than restoration. This describes the cloudy headlamps in that evaluation, not every vehicle or every degree of haze.
AAA separately published a figure of about 22% of new-headlamp output in a 2022 article reporting its research. That is a separate AAA guidance figure and should not be merged with the 2018 result as though they were the same test. Neither percentage should be treated as a guaranteed output for a particular car or as a promise of what a restoration kit will achieve.
Rank #3

- KIT INCLUDES: 1 - Disc Pad Holder, 3.25 in (8,2 cm) 6 - 3M Gold Sanding Discs 500 Grit, 3 in (7,6 cm) each 4 - 3M White Finishing Discs 800 Grit, 3 in (7,6 cm) each 1 - 3M Trizact Refining Disc 3000 Grit, 3 in (7,6 cm) 2 - 3M Quick Headlight Clear Co
- KITS CONTAIN masking tape, light sanding discs, wax protectant and more
- FOR USE ON plastic lenses – headlights, taillights, fog lights, directional lights and more
- 3M abrasive technology removes yellowing and buildup without damaging plastic lens surface
- Easy to use – choose a kit with no tools required, or for use with a common household drill
Restoration is most relevant when the problem is visible exterior haze. Clean the lens first, then follow the kit’s instructions if you choose a DIY product. Protect nearby paint when using abrasives. Professional restoration is another option. Restoration may improve the lens, but it is not guaranteed to make it perform like a new assembly. Results depend on the assembly and procedure involved.
The Tool Desk
Outbyte PC Repair FREERepair Windows errors before they cause bigger problemsFix Now →Outbyte Driver Updater FREEScan for outdated or missing drivers - takes under a minuteDriver Scan →If the lens is physically damaged or remains rough or cloudy after restoration, replacement may be the more suitable route. In AAA’s tested comparison, replacing the assembly improved light output more than restoration. That finding can inform the choice, but it does not establish that replacement is necessary for every cloudy lens; severity, condition, vehicle fitment, and the result of restoration matter.
Restoration, bulb replacement, or assembly replacement?
Think of these as different answers to different confirmed problems, not competing upgrades. Restoration addresses haze on the exterior lens. A bulb replacement addresses a failed bulb when the correct bulb has been identified. Assembly replacement is a consideration for physical damage or severe deterioration that remains after restoration. Electrical diagnosis and professional aim inspection address problems that polishing cannot correct.
When weighing options, compare the confirmed cause, how severe the lens condition is, the likely improvement, the part’s fitment to your vehicle, the labor involved, and whether aim will need checking. There is no universal price, labor estimate, or single cost winner. Ask for a vehicle-specific quote that makes clear whether it covers restoration, an assembly, diagnosis, or aim adjustment; do not compare a lens-only service with a broader repair as if they were the same job.
Replacement may deliver a greater improvement than restoration in the AAA testing, but replacing a clear, undamaged assembly does not address an electrical fault or incorrect aim. Conversely, an appropriate bulb cannot repair a cloudy lens. Matching the remedy to the cause is the practical way to avoid paying for a part or service that cannot solve the observed symptom.
Free tools Windows power users keep installed
One-click scans. No signup required.
Rank #4
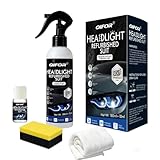
- KIT CONTENTS - Each headlight restoration kit includesOne bottle of headlight yellowing removal solution (6.09OZ), one bottle of headlight crystal plating solution (0.34OZ), one towel, and one sponge
- LASTS AS LONG AS YOU OWN YOUR VEHICLE! - This is a CERAMIC coating for cars that chemically bonds to your headlights and provides UV protection for as long as you'll own your vehicle.
- NO POWER TOOLS REQUIRED - Everything is included in the kit for your car. There are no tools required that could potentially damage your headlights or paint.
- QIFOR Headlight Cleaner Oxidized and Yellowed Finish: The headlamp restorationfluid is designed to provide a yellowed finish, helping to restore the original color and appearance of your headlamp
- How to Use: ① Spray the product onto the lampshade and wire with a rag.② Spray the headlightcoating onto the coatingsponge and wipe evenlyin a direction. ③Wait for natural drying
Bulb replacement and safety cautions
Use the bulb specification and service procedure in the owner’s manual. A bulb upgrade is not automatically compatible: a lamp is designed as a system, and an unsuitable bulb or improper aim can create glare rather than improve useful road lighting. The lighting manufacturer warns that noncompliant upgrades and improper aim can contribute to glare, so do not treat a higher-output claim as proof that an option is right for your vehicle.
Halogen bulbs contain pressurized gas and can burst if dropped or scratched, according to an NHTSA-hosted vehicle manual. Follow the vehicle’s handling instructions and have a qualified technician do the work if you are unsure. Do not assume every car uses the same bulb or access procedure; the owner’s manual is the reference for vehicle-specific requirements.
Independent reader supportYour contribution helps us test, update, and keep practical guides available for everyone.When to use a repair shop
Ask a qualified technician to inspect the vehicle if the cause is unclear, lamps flicker or work intermittently, both remain dim after an identified simple fix, the housing is damaged, or the beam aim needs adjustment. A shop can investigate the vehicle-specific electrical system and check aim rather than treating every dim-light complaint as a lens or bulb problem. Seek an aim inspection in particular if the concern began after a headlamp replacement or collision, or if the beam seems too low or produces glare.
When arranging service, describe what you have checked and what remains: whether one lamp or both are affected, whether the lenses remain cloudy after cleaning, whether a bulb failure was confirmed, and whether the lamps flicker or appear mis-aimed. These details help distinguish the different repair paths. Ask what the proposed service addresses and whether aim inspection is appropriate after the work. Because parts, procedures, and fitment vary by vehicle, a qualified technician or the vehicle’s manual is the right guide for specifics.
AAA’s 2022 article quotes Greg Brannon, its director of Automotive Engineering and Industry Relations: “Any deterioration in the lenses reduces this already poor visibility and increases glare for oncoming drivers.” That warning captures why lens condition and beam direction both matter: the goal is useful light on the road without creating glare for others.
Best Value

- KIT INCLUDES: 1 - 3M Trizact Refining Disc 1000 grit, 3 in/7.6 cm 1 - 3M Trizact Refining Disc 3000 grit, 3 in/7.6 cm 2 - 3M Quick Headlight Clear Coat Wipes 1 - Foam Pad with 3M Hookit Attachment, 3 in/7.6 cm 1- Disposable Glove
- FOR USE ON plastic lenses – headlights, taillights, fog lights, directional lights and more
- 3M abrasive technology removes yellowing and buildup without damaging plastic lens surface
- Easy to use – choose a kit with no tools required, or for use with a common household drill
- Save hundreds vs. replacing headlight lenses
Frequently Asked Questions
What should I check first if my headlights look dim?
Clean both outer lenses, then check whether haze or yellowing remains. Note whether one lamp or both are affected, whether either flickers or goes out intermittently, and whether the beams seem too low or cause glare. These observations help identify the right inspection, but they do not confirm a diagnosis on their own.
Will a headlight restoration kit fix dim headlights?
A restoration kit may improve a cloudy or yellowed exterior lens. It will not fix a failed bulb, electrical fault, damaged assembly, or poor aim, and restoration may not return output to that of a new assembly. Follow the kit instructions and protect nearby paint when using abrasives.
Should I restore or replace a cloudy headlight assembly?
Restoration is an option for exterior haze. Consider assembly replacement if the housing is damaged or the lens remains rough or cloudy after restoration. AAA’s tested comparison found that replacement improved output more than restoration, but the result depends on the assembly and procedure and is not a universal prediction.
Can I install a brighter bulb to solve dim headlights?
Do not assume an upgrade or conversion is compatible. Headlamp design and fitment vary, and noncompliant bulbs or improper aim can contribute to glare. Check the owner’s manual for the specified bulb and seek professional help if the cause is uncertain.
When should I have a mechanic check my headlights?
Get qualified help if the lamps flicker or work intermittently, both remain dim after a confirmed simple fix, the housing is damaged, the cause is uncertain, or the beams appear mis-aimed. Aim inspection is particularly relevant after lamp replacement or a collision.
Is there a standard cost to fix dim headlights?
No universal cost is established. The appropriate work may be cleaning, lens restoration, a vehicle-specific bulb, assembly replacement, electrical diagnosis, or aim adjustment. Cost depends on the confirmed cause, vehicle fitment, lens condition, labor, and whether aim needs checking.
The Bottom Line
Start with clean lenses and careful observation: compare the lamps, note any flickering, and consider whether the beams look mis-aimed. Restore only when exterior haze is the issue; use the specified bulb for a confirmed bulb failure; consider assembly replacement for damage or severe lens deterioration; and seek diagnosis or aim inspection when symptoms persist or the cause is unclear. No single kit, bulb, or cost fits every vehicle.
Do these 3 things before closing this tab:
1Repair Windows errors before they cause bigger problems2Scan for outdated or missing drivers - takes under a minute3Clear out junk files and repair common Windows errorsQuick Recap
Product prices and availability are accurate as of the date/time indicated and are subject to change. Any price and availability information displayed on Amazon at the time of purchase will apply.