Recommended Free Tools
Inspect a classic Dodge Charger in this order: verify the exact year and body, document its history, check panel alignment and paint in strong light, examine the shell from below, probe known water traps from both sides, and then verify suspicious repairs with records and a qualified specialist. Concentrate on structural metal—rails, crossmembers, floors, suspension attachments and welded seams—because attractive paint can hide serious corrosion or poorly repaired crash damage.
Identify the Charger before judging its condition
Classic Chargers do not share one universal body specification. Start by writing down the model year, body style, VIN and any major body or restoration changes. Use the factory service or body manual for that exact edition; MyMopar lists several year-specific Dodge Charger manuals, but the applicable manual must be matched to the car rather than assumed from its appearance.
As an Amazon Associate I earn from qualifying purchases.
Ask the seller for restoration invoices, parts receipts and photographs taken before, during and after bodywork. Record which panels, rails, floors or other structural sections were replaced. If the car is represented as a rare, high-value or special model, have its identity and documentation checked by a marque specialist. A visual inspection alone does not establish authenticity for every Charger generation.
Free tools Windows power users keep installed
One-click scans. No signup required.
Record the starting condition
- Photograph all four sides, the roof, the underside and the engine-bay aprons before moving or cleaning anything.
- Write down the VIN, stated model year, body style and the seller’s description of prior repairs.
- Note missing trim, non-original panels, fresh undercoating and areas that cannot be seen without removing carpet or access panels.
- Keep the seller’s explanations with the photographs so you can compare them with invoices later.
Bring the right tools and make the inspection safe
A bright flashlight, a small magnet and an automotive paint-thickness gauge are useful screening tools. The magnet can reveal a change from steel to non-metallic filler on some panels; the gauge can identify an unusually thick paint or filler stack. Neither tool detects every substrate or repair, and neither proves that a car is structurally safe.
#1 Best Overall
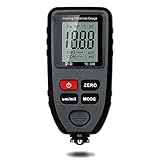
- Auto-Detection for Steel and Aluminum Coatings:This Coating Thickness Gauge utilizes advanced dual technology to automatically recognize ferrous and non-ferrous substrates, making it easy to measure coating thickness on both steel and aluminum without any guesswork
- Ideal for automotive paint inspection, powder coating checks, and metal surface finishing. Commonly used on used cars, anodized aluminum, bathroom fittings, bike frames, stadium seats, lockers, appliances, and more. (Note: Designed for metallic surfaces only.)
- A Must-Have for Used Car Buyers:Don't let hidden repairs catch you off guard. This tool lets you check the paint thickness on each car panel, helping you spot any previous accidents or repairs before buying a used vehicle
- Save Money on Used Car Purchases:When buying used cars, this paint thickness gauge helps you identify potential issues by ensuring the paint thickness is consistent across all panels. Great for detecting accident repairs and verifying if the car has been in a heavy crash
- Important Note: Please note that this gauge is specifically designed to measure coating thickness on metal substrates. It cannot be used on non-metallic materials such as plastic, fiberglass, or wood.
Arrange safe access to the underside with a lift or properly rated stands on solid ground. Never crawl beneath a car supported only by a jack. If the rails, crossmembers, suspension attachments or welded repairs look deformed, perforated or questionable, stop treating the visit as a do-it-yourself certification and arrange an examination by a qualified classic-Mopar body specialist.
Walk around the body in good light
Stand several feet away and inspect the car in daylight or bright, diffuse lighting. Look down the length of each side and compare reflections from left to right. A straight reflection should not suddenly kink, ripple or change texture at a panel boundary.
Panel gaps and alignment
- Compare the gaps at the hood, both fenders, the doors and the trunk.
- Check whether a gap is consistently wide, narrow or tapered rather than merely measuring one point.
- Look at how the doors, hood and trunk sit flush with adjacent panels when closed.
- Compare the left and right sides for differences in edge height, reveal shape and alignment.
Uneven gaps can result from collision damage, replacement panels, restoration adjustments or ordinary age. Treat them as prompts to inspect the mounting points and the backs of the panels, not as proof of a crash.
Quick wins for a faster PC:
Scan for outdated or missing drivers - takes under a minuteDriver Scan →Clear out junk files and repair common Windows errorsFree Scan →Paint, texture and masking clues
Search for color or gloss changes, orange-peel texture that differs from neighboring panels, sanding or masking lines, bubbling and localized undercoating. Overspray on weatherstrips, fasteners or hidden edges can indicate that a panel was refinished. A sharp boundary in undercoating deserves the same follow-up as a sharp paint boundary.
Rank #2

- HIGH ACCURACY COATING THICKNESS MEASUREMENT – Digital paint thickness gauge for metal surfaces with 0.1 μm (0.01 mils) resolution and ±(3%+2 μm) accuracy, helping detect repainting, repairs, and uneven coating thickness during used car inspection, detailing work, and professional quality control. Suitable for checking doors, hood, roof, fenders, and other painted metal panels where accurate coating evaluation is required.
- EASY & FAST OPERATION — FACTORY CALIBRATED – Factory calibrated and ready to use right after installing batteries. Large backlit LCD with clear readings and simple buttons make this coating thickness meter easy for professionals and first-time users. Ideal for pre-purchase vehicle checks, car dealership inspections, trade-in evaluation, and mobile appraisers who need quick and convenient measurements without complicated setup.
- AUTOMATIC Fe / NFe SUBSTRATE DETECTION – Automatically detects Fe (steel/iron) and NFe (aluminum/copper) and selects the correct measuring method. Ideal for modern vehicles with mixed body materials and accurate results without manual switching. This helps users inspect steel doors, aluminum hoods, and other metal body parts with the correct measurement principle applied automatically.
- WIDE MEASURING RANGE FOR AUTOMOTIVE & INDUSTRIAL USE – Measuring range 0–1500 μm (0–59.1 mils) covers factory paint, repainting layers, and thicker coatings. Suitable for car body panels and industrial coated metal parts. Whether checking original automotive paint thickness or verifying thicker coating applications on metal components, the gauge provides a practical working range for many inspection scenarios.
- DUAL TECHNOLOGY: MAGNETIC INDUCTION + EDDY CURRENT – Uses magnetic induction for ferrous metals and eddy current technology for non-ferrous metals, providing stable, repeatable measurements across steel, iron, aluminum, and copper substrates. This dual-technology design allows one device to cover common automotive body metals without requiring separate meters or manual probe replacement.
One clue is weak evidence. Aged paint, a documented restoration or a panel adjustment can produce the same appearance as a collision repair. Build a case from several independent observations and then compare it with the seller’s records.
Inspect the shell from below
The underside often reveals what a polished exterior conceals. With the vehicle safely supported, use the flashlight to follow the structural rails, crossmembers, floor seams and suspension attachment areas. Look for perforation, flaking or soft metal, distorted rails, abrupt patch edges and welds that differ from surrounding factory construction.
What to examine
- Front and rear frame rails, including transitions and areas hidden by dirt or undercoating.
- Crossmembers and the points where suspension components attach.
- Floor-pan seams, drain areas and the metal immediately around patches.
- Trunk structure and the underside of trunk drop-offs.
- Non-factory welds, overlapping patches, excessive grinding or a seam sealed in a way that differs sharply from nearby joints.
Surface discoloration does not tell you how much metal remains. Structural rust, a distorted rail or questionable welding around a suspension or crossmember attachment warrants a specialist assessment before purchase or major restoration spending.
What’s actually slowing this PC down?
Pick the symptom - the matching free tool is one click away.
Where classic Chargers commonly trap water
The following locations are emphasized by a specialist checklist for second-generation Chargers. Adapt the list to the exact year and body style rather than treating it as a universal diagram. A separate guide for 1969–1970 Charger Daytona cars identifies several of the same B-body areas and adds rear-rail inspection near the spring perches.
Rank #3
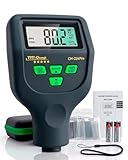
- AUTOMOTIVE PAINT THICKNESS GAUGE – CM-224PRO Designed for measuring coating thickness across vehicle panels during structured professional evaluation. Compare readings on doors, hood, roof and body panels to assess coating consistency and identify thickness variations that may indicate refinishing or prior repair. Suitable for dealerships and inspection professionals.
- 0–59.1 MILS RANGE WITH 0.01 MILS (0.1 µM) RESOLUTION – PROFESSIONAL CONSISTENCY Measures coatings from 0–59.1 mils (0–1500 µm) with stable resolution of 0.01 mils (0.1 µm), supporting consistent and repeatable comparison between factory coating and refinished surfaces during professional inspections.
- FE NFE AND ZINC AUTO DETECTION – AUTOMATIC SUBSTRATE RECOGNITION Automatically identifies steel (Fe), aluminum (NFe) and galvanized surfaces (Zn), supporting inspection of modern vehicles built with mixed body materials without manual switching or mode selection.
- PROFESSIONAL PROBE DESIGN – STABLE AND REPEATABLE CONTACT Engineered probe construction supports consistent surface engagement and repeatable readings during multi-point inspection routines in professional workshop environments.
- FAST PANEL-TO-PANEL MEASUREMENT FLOW – EFFICIENT FULL VEHICLE SCANNING Optimized for efficient professional workflow: place the probe vertically, read the value and continue across panels during dealership and workshop-based inspections.
| Area | What to look for | Why it matters |
|---|---|---|
| Trunk floor and drop-offs | Perforation, soft spots, patch panels, dampness, thick seam sealer and corrosion hidden by trim or a spare tire | Water can remain in low areas and attack both visible and reverse surfaces |
| Torsion-bar crossmember | Flaking metal, holes, distorted sections or repairs that do not match adjacent welds | It is a structural and suspension-related area; damage needs expert evaluation |
| Front frame rails near the firewall | Rust scale, ripples, straightening marks, patch seams and altered undercoating | Rail condition affects the integrity of the front structure |
| Floor pans beneath the front seats | Rust-through, damp carpet, overlapping patches and corrosion along seams | Moisture may enter from above while corrosion progresses underneath |
| Cowl and firewall seams | Sealer cracks, bubbling, rust at joints and evidence of water entry | Hidden corrosion can extend into adjacent structural and cabin metal |
| Rear quarter panels near the wheel opening | Bubbling, swelling, ripples, filler edges and rust visible from the wheel-house side | Corrosion can start behind the outer quarter and remain invisible from the street side |
| Rear rails near spring perches on 1969–1970 Daytona examples | Scale, perforation, repaired seams or deformation around the perch area | The Daytona-specific guide treats this as a critical B-body inspection point |
Check both sides of every suspected area
Inspect the exterior skin, then look from the wheel well, cabin, trunk or underside wherever access allows. Rust that looks minor on one side may be extensive on the reverse. Lift removable mats or carpet where practical, remove the spare tire and inspect behind trim without damaging fragile parts. Photograph each finding before moving coverings back into place.
How to recognize collision repairs
Search for a pattern rather than a single giveaway. Useful clues include inconsistent hood, fender, door or trunk gaps; different paint color or texture; sanding and masking lines; filler buildup; ripples in broad reflections; disturbed fasteners; non-factory welds; patch seams; and undercoating that stops or changes abruptly.
Inspect the backs of panels
When access is safe, inspect inner fender surfaces, trunk sides, door edges and the reverse of quarter panels. Look for fresh weld beads, ground-through metal, duplicated layers, replacement fasteners or paint overspray in places that would normally remain protected. Compare left and right sides because an untouched side provides a useful reference for factory construction and finish.
Outdated Drivers Are Slowing You Down
One free scan finds every outdated or missing driver and matches the right update for your exact hardware.Free scan · exact hardware matchPC Slower Than It Used to Be?
A free scan shows the junk files, broken settings and background clutter dragging Windows down - then fixes them in one click.Free scan · Windows 10 & 11Use paint-depth readings intelligently
Take readings panel by panel and record them in a sketch or spreadsheet. A single high reading is a reason to inspect that panel more closely; it is not a verdict on the quality or cause of the work. The Daytona inspection guidance recommends paint-depth readings together with internal-rail inspection and documented restoration history for 1969–1970 Daytona cars. Do not generalize a Daytona-specific reading pattern to every Charger.
Rank #4

- 【Auto-ID Dual Tech & Material Note】This paint depth gauge automatically identifies Fe/NFe substrates without manual switching. The device is specifically designed for metal substrates and is not suitable for plastic, carbon fiber, or wood. It is ideal for detecting heavy paint on car bodies, boat hulls, and industrial steel structures to ensure accurate readings.
- 【High Precision & Wide Range】Equipped with a wear-resistant probe, this coating thickness gauge delivers lab-grade stability across a 0-78.7 mils (0-2000μm) range. It features high resolution of 0.004 mil / 0.1μm for 0-3.9 mils (0-99.9μm) and 0.04 mil / 1μm for 3.9-78.7 mils (100-2000μm), accurately detecting minute changes in powder coatings or anodized layers. With a measurement accuracy of ≤ ±(3% H+ 2μm / 0.079mil), it ensures reliable results for professional tasks, from measuring paint on curved bumpers (min radius 5mm/197mils) to verifying films on machinery.
- 【Single/Continuous Scan Mode】This paint meter offers more than just single scans by displaying real-time statistics (Avg, Max, Min) of the last 10 measurements in continuous scanning mode. Users can quickly identify uneven spraying on hoods or thickness variations in industrial furniture powder coatings through statistical data. This method reflects overall process quality better than single-point measurements.
- 【Data Storage & USB Output】This digital thickness gauge features a "Data Hold" function to lock readings after measuring in deep engine bays or narrow gaps. It is equipped with a Type-C interface that supports exporting 30 sets of stored data to a PC for generating professional inspection reports. This capability is perfect for creating check reports for used car sales or quality control logs.
- 【Smart Calibration & Ergonomics】This mil thickness gauge comes with Fe/NFe calibration foils and substrates for zero-point and thickness calibration before work. Operators must ensure no dust, wrinkles, or irregularities exist between the thickness standard sheet and the substrate during use. Pressing the OK key allows users to clear historical calibration records easily.
Use a magnet as a screening test
Compare the magnet’s attraction across apparently similar steel areas. A weak or absent attraction may indicate non-metallic filler, a non-steel replacement or an intervening coating. The test cannot identify aluminum, fiberglass, thick paint, every filler type or the reason a material was used. Confirm any anomaly by inspecting the reverse side and asking for repair photographs.
Inspect the cabin, cowl and trunk for water evidence
Lift removable carpet, mats and trunk coverings where the seller permits. Feel for dampness and look for tide marks, staining, patched seams, pinholes and fresh coatings that conceal the original surface. Pay particular attention to the trunk floor and drop-offs, the area under the back window and floor pans below the front seats.
Inspect cowl and firewall seams from the engine-bay side and the cabin side when accessible. A water entry path may leave corrosion away from the point where water first entered. Do not scrape aggressively or pull bonded trim simply to improve a first-look inspection; document what remains inaccessible and make access part of a professional pre-purchase examination.
Verify what the seller says
Ask the seller to identify every repaired or replaced panel and to state when, where and by whom the work was performed. Request invoices, photographs, parts records and any prior inspection reports. Compare the paperwork with your photographs: a claimed quarter-panel replacement should correspond to visible seams, fasteners or documented work, while an undocumented patch in a rail deserves additional scrutiny.
Best Value

- (*^_^*) [Record Various Data] It can record the average value, maximum value, minimum value, dif at the same time, and supports up to 50 data for statistics, making the numerical data you measure more accurate and convenient. If the auto power off function is on and there is no for 3 minutes, the instrument will automatically shut down to save battery power.
- (*^_^*) [Multifunctional] Thickness gauges are used to measure the thickness of metal coatings and other coatings such as paint/enamel/chrome on steel, paint and anodized coatings on aluminum/copper. Automatic detection of substrate properties. It has small size and high precision battery level indicator. It also has automatic shutdown function, used for FE/NFE.
- (*^_^*) [Precision Integrated Probe] It is important to check the car paint to make sure the paint thickness is about the same on each panel and to determine if the car is in good condition with a car paint inspection thickness gauge when you buy the car. The instrument adopts the principles of electromagnetic induction (F probe) and eddy current effect (N probe) to automatically detect the properties of the substrate.
- (*^_^*) [What Can Be Read and Detect Paint Depth] The large LCD display of the paint depth gauge shows the metal type, operating mode, quantity, battery status and the reading in µm, mm or mils. The thickness gauge has a measurement range of 0-2000um, an accuracy of ±(3%+1um), and a resolution of 0um-999um (1um).
- (*^_^*) [Widely Uses] It is used to non-destructively measure the thickness of coatings and paints. It is an essential equipment for material surface treatment, widely used in manufacturing, metal processing industry, chemical industry, commodity inspection and other fields, and can also work stably in laboratories, workshops and outdoors. Suitable for automotive paints, powder coatings, anodized aluminum, bathroom accessories, bicycle frames, stadium seating, outdoor sheds, furniture, swings, c
Questions worth asking
- Was the car ever in a collision, flood or long-term outdoor storage?
- Which rails, crossmembers, floors, quarters or cowl sections were cut out or welded?
- Was corrosion removed from both sides of the metal, and how was the repaired area protected afterward?
- Are there photographs before the paint was applied?
- Which parts are original, reproduction or sourced from another Charger?
Inconsistent answers do not prove deception, but they increase the value of an independent inspection. For a high-value car, originality and documentation can matter as much as the visible finish.
Follow a repeatable inspection sequence
- Confirm identity. Record the VIN, exact year, body style and stated modifications. Obtain the matching factory manual.
- Collect history. Photograph invoices and restoration images, and list every claimed panel or structural replacement.
- Survey the exterior. In good light, compare reflections, gaps, color, texture, bubbling, overspray and undercoating.
- Map suspicious panels. Use the magnet and paint gauge comparatively, recording readings and anomalies rather than assigning a pass or fail.
- Inspect the cabin and trunk. Lift removable coverings, check for dampness and inspect floors, drop-offs and the area below the back window.
- Examine the underside safely. Follow rails, crossmembers, suspension attachments, floor seams and trunk structure with a flashlight.
- Inspect reverse surfaces. Look from wheel wells, the engine bay, trunk and interior for patches, welds, filler and corrosion that the exterior hides.
- Document every concern. Photograph the location, scale and surrounding reference points, then match each item to the seller’s explanation.
- Escalate when necessary. Before committing to a valuable or structurally questionable car, arrange an independent classic-Mopar body inspection.
How to compare two Chargers
When choosing between cars, do not let a shinier paint job outrank sound structure. Compare the vehicles in the following order.
| Priority | Decision question | What a stronger candidate shows |
|---|---|---|
| 1. Structural condition | Are rails, crossmembers, floors and suspension attachments solid and straight? | No perforation, soft metal, unexplained deformation or questionable structural welds |
| 2. Repair quality | Are patches and panel replacements properly fitted and accessible for inspection? | Consistent seams, sound welds and no abrupt concealment with filler or undercoating |
| 3. Documentation | Can the seller support the repair story? | Invoices and photographs that match the observed work |
| 4. Model-year originality | Do the body parts and construction suit the exact year and claimed specification? | Evidence reviewed against the correct manual and, for special models, by a marque specialist |
| 5. Correction feasibility | Can defects be repaired with the available skills, access and evidence? | A clear scope that a qualified body specialist can inspect and price; no hidden structural unknowns |
No general rust-prevalence percentage or reliable all-years repair-cost average is established for classic Chargers. Treat each car’s measured condition and repair documentation as more useful than a seller’s claim that a certain amount of rust is “normal.”
When a specialist inspection is essential
Arrange an independent inspection before purchase when you find perforation, soft or flaking structural metal, distorted rails, questionable welds, corrosion around suspension or crossmember attachments, extensive undocumented repairs or conflicting identity evidence. A specialist is also prudent when the car’s value depends on originality or a special-model claim.
Choose an inspector with experience in classic Mopar bodies and ask for a written report with photographs. For 1969–1970 Daytona examples, the specialist guide specifically calls for a Mopar B-body-experienced pre-purchase inspector. The same principle applies more broadly: structural judgment requires knowledge of the relevant body construction, not just a paint inspection.
Understand what repair guidance applies
A Chrysler collision bulletin dated August 14, 2012 discusses welded sheet-metal replacement on a later Charger and emphasizes following the manufacturer’s guidance and restoring corrosion protection around welds. It is useful context for why hidden protection matters, but it is not a factory repair procedure for a classic Charger.
For any actual repair plan, use the correct year-specific manual and a qualified body specialist. A repair that looks smooth from the outside can still fail if corrosion protection, seam treatment or the reverse side of the metal was neglected.
Quick Recap
Final inspection checklist
- Exact VIN, year and body style recorded
- Matching factory manual identified
- Restoration invoices and photographs requested
- Panel gaps and reflections compared side to side
- Paint color, texture, bubbling, overspray and undercoating changes photographed
- Magnet and paint-gauge anomalies recorded as follow-up items
- Trunk floor, drop-offs and area beneath the back window inspected
- Floor pans, cowl, firewall, quarters and wheel-opening areas checked from both sides where possible
- Rails, torsion-bar crossmember, crossmembers and suspension attachments inspected safely from below
- Non-factory welds, patch seams, ripples and disturbed fasteners documented
- Seller’s explanations compared with physical evidence
- Independent specialist engaged for structural, undocumented or high-value concerns
Product prices and availability are accurate as of the date/time indicated and are subject to change. Any price and availability information displayed on Amazon at the time of purchase will apply.




