Free tools Windows power users keep installed
One-click scans. No signup required.
You can build a simple moving model car from cardboard or a clean plastic container, bottle-cap wheels, skewers and straws. But those materials alone do not make it radio controlled: a true RC car also needs a radio transmitter and receiver plus electronics to control the drive. Start with the simple rolling chassis below, then choose either rubber-band propulsion or a small motor—or treat radio control as a separate, more advanced project.
Choose the kind of car you want to build
| Build | Power and materials | What it does | Complexity |
|---|---|---|---|
| Rubber-band car | Cardboard or a container, wheels, axles, straws and a rubber band | Stores energy when wound, then rolls when released | Best starting point for a simple moving model |
| Battery-motor car | Similar chassis, plus a compatible small DC motor, battery holder, batteries and switch | Uses a battery-powered motor to turn the vehicle | More parts and wiring; still not necessarily remote controlled |
| Radio-controlled car | A chassis and drivetrain plus a compatible transmitter/receiver, controller and drive electronics | Allows remote control of motion; steering and throttle depend on the design | Advanced project requiring component compatibility and electrical setup |
There is no head-to-head test establishing one design as universally better. For a first build from common supplies, the rubber-band version keeps the parts and setup simple. Choose the motor version if you want battery-powered motion, and plan a separate control system if remote operation is essential.
Gather the common materials
For a basic chassis, use a small, light piece of corrugated cardboard or a clean, empty plastic container. DIY.org suggests a cardboard body about 15 cm by 8 cm for its activity; treat that as a construction example, not a required size. You will also need:
- Four bottle caps or container lids for wheels
- Two straight wooden skewers or similar sticks for axles
- Two short pieces of drinking straw to guide the axles, if using cardboard
- Rubber bands for propulsion
- Tape, a ruler and scissors
- Optional: a small DC motor, compatible battery holder, batteries and switch for a motorized version
DIY.org’s vehicle-design activity uses cardboard, skewers or straight sticks, four bottle caps, two straws, rubber bands, tape, scissors and a ruler. WVU Extension’s rubber-band car activity describes a container-body approach using skewers and container lids or caps.
Quick wins for a faster PC:
Repair Windows errors before they cause bigger problemsFix Now →Scan for outdated or missing drivers - takes under a minuteDriver Scan →#1 Best Overall

- Fun STEM Project with Real Engineering Concepts: Kids build and race their own rubber band-powered cars and racers, exploring motion and energy transformation in action. Supports many NGSS expectations related to motion, force, and energy.
- Easy and Intuitive Assembly for All Skill Levels: Designed with simplicity in mind, each car kit features easy to assemble parts and step-by-step instructions. No glue or special tools required, so students can make their own car and go.
Build and check the rolling chassis
- Mark the axle positions. On a cardboard body, mark two lines across the underside, square to the car’s centerline—one near the front and one near the rear. Keep the spacing and alignment consistent. For a container body, mark or make aligned axle holes through opposite sides.
- Add axle guides. Tape short straw sleeves across the underside at the marks. The skewers should pass through the straws without squeezing them. If using a container, pass the skewers through the aligned holes instead.
- Thread the axles. Slide one straight skewer through each guide or set of holes. Check from above that the axles are parallel and not angled toward one another.
- Fit the wheels. Make a hole in the center of each cap or lid and push one onto each axle end. Leave a small gap between each wheel and the body so the wheel does not rub. The wheels should be secure but still turn with the axle.
- Roll-test before adding power. Set the car on a clear, level surface and give it a gentle push. If it drags or veers sharply, check for rubbing wheels, skewed axles or guides that are too tight. DIY.org notes that tight cap holes or squeezed straw supports can stop the wheels from spinning freely.
Option 1: Add rubber-band propulsion
A rubber-band drivetrain stores energy when you wind it and releases that energy to turn the axle. NASA JPL Education describes its cardboard rover challenge as building a rubber-band-powered rover that can “scramble across the room.” The activity uses cardboard, wheels, a pencil axle, rubber bands, a straw, tape and scissors.
- Attach the band. Connect one end of a rubber band to the chassis and the other to the rear axle, following the layout of the chosen design. The band must engage the axle so winding it can turn the wheels.
- Check the band path. Keep the band clear of the body and wheels. WVU Extension advises that the band should be taut; it should transmit motion without pulling the axle or chassis out of alignment.
- Wind and release. Turn the rear wheels or axle to wind the band, place the car on a clear, level surface, then let go. Keep hands and faces clear of moving parts.
For a source-guided build, see NASA JPL Education’s cardboard rover activity and WVU Extension’s rubber-band car activity. Neither establishes a universal speed or travel distance, which will vary with the build and test surface.
Rank #2

- Classroom Engineering Project, Rubber Band Propeller Car Kit: Students build rubber band powered propeller cars and race them to test how energy converts to motion. Designed for classrooms, after-school programs, STEM clubs, and birthday parties.
- Complete Supplies for 10 Builds: Includes plastic wheels, laser cut pieces, rubber bands, plastic propeller, and paper. All materials are organized and ready to distribute, with no additional supplies required.
- Engineering Concepts in Action: Students apply concepts of energy and propulsion as they build and test their cars. Supports structured design-and-test engineering challenges.
- Clear Instructions for Independent Work: Step-by-step guide allows students to build and test with minimal teacher intervention. Manageable for one instructor with a full class.
- Durable Components for Repeated Use: Parts are built to withstand classroom assembly and testing. Consistent build quality ensures reliable results across all student groups, from grade 3 through age 14.
Option 2: Add a small battery-powered motor
A motorized model adds electrical parts but does not become radio controlled just because it moves under battery power. TeachEngineering’s mini electric vehicle activity specifies a 3 V mini DC motor, two AA batteries, a 2-AA battery pack with leads and a switch, and a rubber-band belt/pulley arrangement or direct band connection between motor and axle. DIY.org’s electric-vehicle activity describes a similar approach using a small motor, a 2-AA holder, a rubber band and a cardboard or small plastic-container body.
- Use compatible parts. Follow the motor and battery-holder specifications; the cited activities do not certify arbitrary motor-and-battery combinations.
- Mount the motor securely. Position it so its shaft can drive the axle through the belt or connection used in the design. Keep the motor and axle aligned.
- Fit and check the drive band. The band should track in line with the motor shaft and axle or pulley. TeachEngineering identifies slipping and a band that is too loose or too tight as issues to watch for.
- Connect the battery holder and switch as directed by the activity and component manufacturers. Do not let exposed leads touch each other or improvise wiring beyond what the instructions specify.
- Test briefly on a clear, level surface. If the motor runs but the wheels do not turn, inspect the band alignment and tension before changing other parts.
See TeachEngineering’s mini electric vehicles activity for its specified components and setup.
Rank #3

- Ideal for science and engineering projects, these wheels are designed to make your rubber band-powered vehicles and mouse trap cars perform the way you expect. A reliable source of replacement mouse trap car parts for classroom builds.
- The wheel axle hole has 4 teeth to grip the included 6 x 1/4" dowels, preventing slippage. Rubber bands add traction to the outer wheel. Extra dowels and rubber bands included.
- Easy to work with! If you have built a car project with CDs for wheels, you know what a hassle that is. These wheels fit snugly onto sturdy wooden dowels, which makes them a good fit for car crafts for kids.
- Wheels measure 4.75 inches in diameter and ¼ inches wide tread, axle hole inner diameter is ¼ inch, the dowels are ¼ by 6 inches, the rubber bands are 1/8 by 3.5 inches.
- Made of sturdy, safe, reusable, and recyclable polypropylene plastic.
What makes a car truly radio controlled?
A radio-controlled car needs a control link between a handheld transmitter and a receiver on the vehicle, as well as electronics that translate received commands into motor control. Depending on the design, it also needs suitable drive motors, motor drivers, power and a steering mechanism—or a differential-drive arrangement that steers by running left and right motors at different speeds. A motor, batteries and an on/off switch provide powered motion, not remote steering and throttle.
One documented example is a Bridgewater State University machine-shop project dated Spring 2026. It uses a FlySky transmitter/receiver pair, an Arduino controller, motor drivers and DC gearmotors, with tank-style steering and a motor cutoff if the signal is lost. That is one project, not a universal parts list. Its 12 V motors and 3S lithium-polymer battery recommendations are not parts guidance for a beginner cardboard car.
Rank #4

- 🔬 STEM Learning Project: Perfect for exploring scientific principles like energy transformation, aerodynamics, and motion.
- 🛠️ Hands-On Assembly: Engages learners with a step-by-step building process that teaches engineering concepts.
- ✅ Complete Kit: Includes 2 rubber bands, 1 screw hook, 2 back wheels, 2 front wheels, 2 axles, a chassis structure, and a propeller.
- 🌍 Educational Focus: Designed for classrooms, science fairs, and home experiments—encourages creativity and problem-solving.
- ⚙️ Durable Materials: Made with laser-cut wooden components for precision and long-lasting use.
Before choosing components, confirm that the transmitter/receiver, controller, motor drivers, motors, steering arrangement and power source are compatible with one another. Follow each manufacturer’s wiring and safety instructions. The radio-control system is an additional engineering project, not a drop-in step that can be made from bottle caps, straws and cardboard alone.
Independent reader supportYour contribution helps us test, update, and keep practical guides available for everyone.Test, troubleshoot and improve one thing at a time
- Car will not roll freely: Check whether wheels rub against the body, cap holes grip the axle too tightly, straw guides have been squeezed shut, or axles are bent or misaligned.
- Car veers: Check that the axles are straight and parallel and that wheels are positioned consistently on both sides.
- Rubber-band car barely moves: Check that the band engages the axle and has enough tension to turn it without shifting the chassis.
- Motor spins but car does not move: Check whether the drive band slips, is out of line, or is too loose or too tight.
- Compare design changes: Run each trial on the same clear, level surface and change one feature—such as axle position, wheel size, band tension or added weight—at a time. Record distance or elapsed time if you want to compare results. Do not add decorations or other weight before the first roll test.
Build safely
- Have an adult handle craft-knife work and hot-glue steps, and supervise children using scissors or other cutting tools. WVU Extension specifically recommends parent help with craft-knife work; DIY.org also calls for adult supervision.
- Keep small caps, batteries and other small parts away from young children.
- Do not allow battery leads to short by touching exposed positive and negative wires together. Follow the instructions supplied with the motor, batteries and holder.
- Test on a clear surface, away from faces, pets, fragile objects and steps.
These precautions address the materials and activities described here; they are not a comprehensive safety standard for every possible improvised electrical setup.
Quick Recap
Best Value
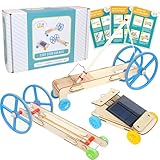
- 3 Car Engineering Projects in One Kit: Includes materials for a Rubber Band Car, Solar-Powered Car, and Mousetrap Car. Each project applies different energy concepts. Designed for classrooms, after-school programs, STEM clubs, and home enrichment.
- Complete Materials for All 3 Builds: All components for each of the 3 car projects are included and pre-counted. No additional materials required — ready to distribute and build.
- Covers Multiple Energy Concepts: Students observe how rubber band energy, solar energy, and stored mechanical energy each power a car differently — applying core physics and engineering concepts across 3 distinct builds.
- Clear Instructions for Independent Work: Each project includes step-by-step instructions that allow students to build and test with minimal teacher intervention. Manageable for one instructor with a full class.
- Durable, Classroom-Tested Components: Parts for all 3 projects are built to withstand classroom use and repeated testing. Consistent build quality ensures reliable results across all student groups.
Product prices and availability are accurate as of the date/time indicated and are subject to change. Any price and availability information displayed on Amazon at the time of purchase will apply.




