The safest way to install a two-channel dash cam is to test both cameras first, mount the rear camera high and near the center of the rear glass, route its cable away from airbags and moving hatch hardware, and choose power based on whether you need parking mode. A 12-volt or compatible USB connection is usually best for simple driving-only recording. Parking mode typically requires a compatible hardwire kit, supported OBD-II accessory, or dedicated dash-cam battery.
This guide covers a front dash cam connected to a wired rear camera—not a standalone reversing camera or factory parking camera. Connector direction, wire colors, fuse locations, cable lengths, and parking-mode behavior vary by camera and vehicle, so the manufacturer’s instructions take precedence.
As an Amazon Associate I earn from qualifying purchases.
Before you begin
Read the dash-cam manual and your vehicle owner’s manual before removing trim. Save both on your phone in case you need them while the vehicle is partially disassembled. Identify the front camera’s dedicated rear-camera input, the correct rear camera and cable for your exact model, the fuse-box location, curtain-airbag areas, and any factory wiring boot used by a hatch or liftgate.
What’s actually slowing this PC down?
Pick the symptom - the matching free tool is one click away.
Compatibility checklist
- The front camera has a dedicated rear, AV-IN, or V-IN port.
- The rear camera and cable are specified for that camera model or series.
- The cable is long enough for the route through your sedan, SUV, hatchback, or wagon.
- The camera supports the rear resolution and frame rate you want.
- The hardwire kit matches the camera’s connector, voltage, and parking-mode requirements.
- The fuse taps match the vehicle’s exact fuse style, such as mini, low-profile mini, Micro2, or Micro3.
- A hatch or liftgate has a safe route through its flexible factory wiring boot.
Do not assume wire colors are universal. For example, VIOFO identifies red as constant/BAT and yellow as ACC in its hardwire guidance, while Thinkware instructs users to follow the markings on the cable. Treat labels and the specific manual—not color alone—as authoritative.
#1 Best Overall

- This is a rotating rear cam that can record inside the car.
- Suitable for REDTIGER F7N & F7NS,Hd resolution:1080P,clear recording during driving.
- The original rear camera for F7N was heavy, but this one is lighter.
- Free choice of installation location, whether front windshield or rear windshield.
- We provide 30 days free return and 18 months guarantee, if there's any quality problems we'll free return or replace for you.
Tools and supplies
- Front-and-rear dash-cam system and its specified rear cable
- Microfiber cloth and glass cleaner
- Plastic trim-removal tools
- Digital multimeter or 12-volt circuit tester
- Fuse puller and vehicle-specific fuse taps, if hardwiring
- Fabric automotive tape, cable clips, or zip ties
- Small socket or screwdriver for the ground point
- Optional painter’s tape, flashlight, gloves, replacement adhesive pad, and trim-removal documentation
For a basic outlet installation, you may need only the camera, rear cable, cleaning supplies, trim tools, and cable-retention materials. Add a compatible hardwire kit, fuse taps, meter, fuse puller, and grounding tool for a fuse-box installation.
Choose the camera locations
Front camera
Place the front camera high on the windshield, close to the vehicle centerline, usually behind or beside the rear-view mirror. Keep it outside the driver’s primary field of view and within the area cleared by the windshield wipers. Avoid tint bands, stickers, mirror housings, and forward-facing ADAS camera or sensor assemblies. A position behind the mirror is often practical, but the vehicle’s sensor layout and legal visibility requirements control.
Use the camera’s live-view function or app to check the actual framing before committing to adhesive. BlackVue also recommends checking the view through its live-view tools and avoiding any obstruction of the driver’s view.
The Tool Desk
Outbyte PC Repair FREEClear out junk files and repair common Windows errorsFree Scan →Outbyte Driver Updater FREEFix the driver behind crashes, sound loss and screen glitchesFind Drivers →Rear camera
Mount the rear camera high and near the center of the rear windshield. Center the lens, not merely the camera body, and aim for a complete rear view with the horizon around the upper-middle portion of the image. Show enough road to judge following distance and impacts, while avoiding excessive sky, headliner, cargo cover, or rear-seat obstruction. A small amount of the vehicle’s body can help with orientation.
Choose clean, dry glass away from the defroster grid. Also check that the rear wiper clears the lens’s viewing area, if the vehicle has one, and that a retractable sunshade or cargo cover cannot block the camera. Thinkware specifically warns about defroster wires, sunshades, lens centering, and adhesive placement in its rear-camera installation guidance.
Factory privacy tint can make night footage darker than the daytime preview. Test nighttime recordings before finalizing the position. If you have a panoramic roof, convertible top, unusual headliner, or exposed route subject to heat or water, professional installation may be safer.
Step 1: Test both cameras before mounting
Connect the rear camera to the front camera and power the system while everything is still accessible. Confirm that:
Free tools Windows power users keep installed
One-click scans. No signup required.
Rank #2

- Suitable for G840S/G840H/G930/G900 Core, the rear camera comes with a 20ft original cable and has dramatically improved glare reduction over the stock camera [Not suitable for G900 Tripro Cabin Version and G900PRO Versions with USB-C Rear Camera (6-Pin)]
- WDR & HDR & Super Night Vision- Compared with ordinary 1080P rear camera, this rear camera can automatically balance the light and dark area of the video to give you a better night vision experience
- IP67 Level Waterproof- Highly Waterproof rear camera. You can use it daringly whatever it’s rainy/dark/snowy/foggy/hot
- High Temperature Resistance- Operating temperature: -20° ~ 70° Storage temperature: -30° ~ 80 °. Our products have passed strict inspections, no need to worry
- Easy to Install- Installation was a snap, as it uses the same connector as the stock camera. Unplug old, plug in new.Manual screw tightening required for installation
- The rear image appears in live view.
- The camera recognizes the rear unit after a restart.
- A short recording creates a playable rear-channel file.
- The image is upright, correctly oriented, and not unexpectedly mirrored.
- The cable connectors fit without force and are fully seated.
This simple test catches a defective camera, wrong cable, incorrect port, or directional connector before adhesive and trim make replacement difficult. Some systems announce a successful rear-camera connection or restart automatically.
Step 2: Clean and mark the rear glass
- Clean the selected area with glass cleaner and a microfiber cloth.
- Remove dust, oil, moisture, and residue, then allow the glass to dry completely.
- Remove the lens’s protective film.
- Use low-tack painter’s tape to mark the horizontal center, mount position, and cable-exit direction.
- Dry-fit the camera and check the live image, defroster clearance, wiper sweep, sunshade, and cargo-cover movement.
Do not use permanent marker on the glass. Remove the adhesive backing only after the position is confirmed. Strong adhesive can be difficult to reposition and may leave residue or affect aftermarket tint.
Step 3: Mount and connect the rear camera
- Confirm the correct camera orientation in the model’s manual. Orientation is not universal: Thinkware says most of its models face with the logo toward the cabin but documents an exception for the X1000.
- Press the adhesive mount firmly and evenly onto clean, dry glass without touching the adhesive.
- Hold it in place for the manufacturer’s specified time and avoid pulling on it while it bonds.
- Leave enough slack for a small service loop near the camera so future adjustment does not strain the connector.
- Plug the rear cable into the rear camera and the opposite end into the front camera’s dedicated rear or V-IN port.
- Follow the cable’s model-specific front and rear markings. Do not force a connector or substitute an apparently similar cable.
For example, Thinkware’s U3000 cable ends are marked “R” for the rear camera and “F” for the front camera, and the manufacturer says the connector should click into place. Other systems may use a different arrangement.
Step 4: Route the rear-camera cable
The usual route is from the rear camera into the top edge of the headliner, along the roofline, down or around an appropriate pillar, along side trim toward the dashboard, and into the front camera. Use a plastic pry tool to lift trim only enough to tuck the cable. Never use a screwdriver against visible trim or glass.
Recommended Free Tools
Hide a cable only when the hidden route is safe. Do not place it across a curtain-airbag deployment path, pedals, gear lever, steering mechanism, sharp metal edge, or moving part. BlackVue’s installation guidance recommends routing near window moldings and rubber seals while keeping wiring away from airbags, pedals, controls, and the driver’s sightline.
Sedan, wagon, and fixed rear glass
- Leave a short service loop at the rear camera.
- Tuck the cable into the headliner’s upper edge without crushing it.
- Follow the roofline to a pillar route that does not interfere with a curtain airbag.
- Continue along factory trim or door seals toward the dashboard.
- Keep slack and connectors away from the driver’s footwell.
The safest side depends on the vehicle’s construction. Do not remove or pull an airbag cover to make a generic route work; consult the vehicle manual or use a professional installer when the route is uncertain.
SUVs and large vehicles
Test the entire route before attaching either camera. Supplied cables may be barely long enough, especially when routed around a large cargo area. Avoid using a route that requires disturbing curtain-airbag trim merely because it is shorter.
Rank #3

- WANLIPO Original Rear Camera for A13 Dash Cam.
- 1080p Full HD resolution.
- 120° wide-angle lens.
- Easy Installation with Cable.
- Exceptional After-Sales Support: The WANLIPO A13 Rear Camera is backed by a dedicated customer support team,ensuring you enjoy peace of mind with our hassle-free 1-Year Warranty and responsive assistance.We are committed to promptly resolving any issues you may encounter.
Hatchbacks and liftgates
A liftgate is different from a fixed rear windshield because the cable must survive repeated movement. Locate the factory rubber wiring boot between the body and hatch. Do not run the cable across exposed hinges, create a tight bend at the hinge, or allow it to be crushed when the hatch closes.
Use the factory boot only if the connector and cable can pass through without damaging the seal. If the connector will not pass safely, do not cut, drill, stretch, or force the boot. Use a manufacturer-approved extension or route, or hire a professional installer. Leave enough flexible slack for the full hatch travel, then open and close the hatch repeatedly to confirm that nothing pinches.
Step 5: Temporarily reassemble and test
Before reinstalling every trim panel, start the vehicle and check both camera views. Record and replay a test drive, not just a live preview. Confirm that both channels save correctly, the rear image remains upright, and no panel bows or rattles.
If any wiring approaches the driver’s footwell, check that the steering wheel can turn lock-to-lock without contacting it. Open and close a hatch or liftgate several times. Confirm that no cable obstructs an airbag cover or deployment path.
Once testing passes, secure the cable with fabric tape or clips. Do not stuff excessive cable into the headliner. Keep connectors away from loose trim, sharp edges, pedals, and hinges. Reinstall panels without forcing them, and confirm that every clip, screw, and seal is back in place.
Choose the power method
12-volt outlet or USB
This is the simplest choice for driving-only recording, temporary installations, leased vehicles, and owners who do not want to work near a fuse box. It is reversible and avoids fuse taps and a chassis-ground connection.
The drawbacks are a potentially visible cable and uncertain behavior after the ignition is switched off. A socket that stays live can keep the camera running and discharge the battery. USB-C describes the connector, not the camera’s parking-mode capability or the port’s power behavior. BlackVue states that its USB-C and dual-USB car-charger methods do not support parking mode and directs users who need that feature to a hardwire cable or external battery.
Rank #4

- It 's suitable for redtiger series dash cam
- It has a certain degree of waterproof ability
- 1080P rear cam
OBD-II power cable
An OBD-II cable can provide a relatively clean installation without a fuse tap on compatible vehicles and cameras. Garmin identifies an OBD-II Constant Power Cable as a self-installable option for compatible cameras.
Compatibility and parking behavior vary. The port may be needed for diagnostics or another accessory, and the cable can affect footwell space. An OBD-II connection is not automatically safer than a proper hardwire installation. Follow the camera manufacturer’s instructions, and do not connect a generic accessory simply because its plug fits.
Fuse-box hardwire kit
Hardwiring is appropriate for a clean permanent installation and is commonly used for parking mode. A typical kit has:
- ACC or switched wire: power with the ignition on and no power after the vehicle shuts down.
- BATT or constant wire: power with the ignition on and off.
- GND: a ring terminal attached to clean, bare, unpainted chassis metal.
Use the correct fuse-tap style. Preserve the original vehicle fuse in the tap and install the camera circuit’s specified low-amp fuse in the separate tap position. Never replace a vehicle fuse with a larger rating, guess a fuse location from another vehicle, or tap a safety-critical circuit without explicit manufacturer or qualified-installer approval.
Fuse-tap orientation matters. Current-flow direction varies by fuse slot, so check with a multimeter or the vehicle documentation. BlackVue’s hardwire instructions cover original-fuse preservation, camera-circuit protection, orientation, grounding, and testing. Thinkware and Garmin both warn that incorrect or unauthorized hardwiring can damage the vehicle, camera, or battery; Garmin recommends approved accessories.
Dedicated dash-cam battery pack
A dedicated battery pack is useful for extended parking mode, vehicles with sensitive electronics, or cars that sit parked for long periods. It powers the camera without relying directly on the starter battery once charged. The trade-offs are cost, installation space, charging, monitoring, and eventual battery replacement. BlackVue describes its Power Magic Ultra Battery B-130A as an independent dash-cam power source that can charge from a 12-volt outlet or fuse box.
Outdated Drivers Are Slowing You Down
One free scan finds every outdated or missing driver and matches the right update for your exact hardware.Free scan · exact hardware matchWindows Errors? Fix Them Before They Spread
Repair common Windows errors and clear accumulated junk for a smoother, more stable PC - no reinstall needed.Free scan · no reinstallHardwire installation procedure
- Turn the ignition off, remove the key, and allow the vehicle to enter its fully powered-down state.
- Locate the fuse box using the vehicle owner’s manual.
- With a multimeter or circuit tester, identify a fuse that remains powered with the ignition off and another that loses power after shutdown.
- Verify both behaviors with the ignition on and off. Do not rely on a fuse chart from another vehicle.
- Install correctly sized fuse taps while retaining the original vehicle fuses.
- Connect the kit’s ACC wire to the verified switched circuit.
- Connect the kit’s BATT wire to the verified constant circuit.
- Attach the ground ring to clean, bare, unpainted chassis metal and tighten it securely.
- Connect the kit to the front camera.
- Enable parking mode in the camera’s settings; hardwiring alone does not necessarily activate it.
- Start the vehicle and verify normal recording.
- Switch the ignition off and verify that parking mode activates after the vehicle shuts down.
- Confirm the camera eventually shuts down at the kit’s low-voltage cutoff or specified timeout.
- Recheck the vehicle after an overnight or longest-normal parking period.
Parking mode requires supported power behavior, not merely a permanently powered camera. Many systems need a hardwire kit or dedicated battery, while some support manufacturer-specific OBD-II or other solutions. A low-voltage cutoff reduces risk but cannot compensate for a weak battery, incorrect wiring, poor grounding, abnormal vehicle sleep behavior, or an unsuitable cutoff setting.
Best Value
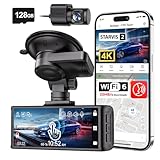
- [4K+1080P Dual Recording] REDTIGER F7N TOUCH captures your drive journey in stunning 4K UHD resolution with STARVIS 2 sensor 170° wide-angle view for the front dash cam and 1080P FHD resolution 140° wide-angle for the rear car camera. Equipped with WDR and HDR technology, the enhanced super night vision ensures better visibility even in low-light situations, providing you with reliable recordings day and night.
- [Voice Control & Touch Screen] F7NTOUCH dashcam features voice commands, allowing for hands-free control of your 4K car camera, which enhances safety by minimizing distractions. The dual camera dash cam also has smart touchscreen that can lock emergency video, turn on wifi, and capture scenery with one click. Redtiger also retains the buttons, multiple control methods are integrated.
- [Built-in GPS & 5.8GHz WiFi] Both Android and IOS users can connect to dashcam WiFi via the REDTIGER Cam app. Although the dash cam is installed wired, you can enjoy wireless control on your smartphone, faster 20MB/s download speed and share your driving experiences in real-time with friends and insurance companies. Car recorder built-in GPS provides traceable location, speed, and accurate route in the recordings.
- [Loop Recording & G-Sensor] REDTIGER F7N TOUCH dual channel dash cam automatically overwrites the oldest footage when the memory is full, ensuring endless recording with the included 128GB card. With a built-in G-sensor that detects sudden movements or impacts, it automatically locks and protects the associated footage when an event is detected on the road, ensuring it won't be overwritten during loop recording.
- [24-hour Parking Monitoring*] REDTIGER Car dashboard camera offers G-Sensor Parking Mode that automatically record when it detects any collisions or sudden motion while vehicles is parked. Time Lapse Parking Mode provides continuous surveillance by offering a condensed overview of any events that may occur during parking periods. *Please note that the parking monitoring function requires a separate hardwire kit.
Final installation checklist
- Front camera does not block the driver’s view, ADAS sensors, or the wiper-cleared area.
- Rear lens is centered and the image includes useful road coverage.
- Rear camera avoids defroster lines, sunshade travel, and cargo-cover obstruction.
- Both channels appear in live view and save playable recordings.
- Night footage is bright enough and free of avoidable tint, dirt, or glare problems.
- No cable crosses an airbag deployment path or hangs near pedals and controls.
- Hatch or liftgate wiring flexes safely through its full range.
- Trim is fully seated with no missing clips or new rattles.
- Hardwire ACC, constant power, ground, fuse ratings, and orientation were verified.
- Parking mode activates and the low-voltage cutoff works as expected, if enabled.
Troubleshooting
Rear camera has no image
- Remove the lens protective film.
- Confirm the camera and cable are compatible.
- Reseat both connectors and use the correct front-camera port.
- Check the cable ends’ required direction and reboot the system.
- Enable the rear-camera setting if the model has one.
- Inspect for a pinched cable, especially under trim or near a hatch hinge.
- Test the camera and cable outside the trim.
- If possible, try a known-good compatible cable.
The image is upside down or mirrored
Check the camera’s mounting orientation, its logo or label direction, and any flip or mirror setting. Do not assume another model uses the same orientation. A mirrored recording can reverse license plates and road positioning, so use the manufacturer’s intended recording orientation.
The rear footage is dark or washed out
Clean the glass and lens, remove protective film, and check for tint, a sunshade, defroster interference, glare, or an obstructed wiper area. Adjust exposure or HDR if available, re-angle the camera, and review night recordings rather than relying only on a daytime preview.
Parking mode does not activate
- Confirm parking mode is enabled.
- Verify ACC loses power and BATT remains powered after ignition-off.
- Check the ground for clean metal and a tight connection.
- Confirm the power accessory supports parking mode.
- Inspect the low-voltage cutoff setting.
- Allow the vehicle to enter sleep mode before judging the result.
The fuse tap is loose or will not fit
Stop and identify the exact fuse type. Never force a mismatched adapter. Confirm tap orientation and that both the original fuse and camera fuse are seated. Use a vehicle-specific solution or a professional installer.
Do these 3 things before closing this tab:
1Repair Windows errors before they cause bigger problems2Scan for outdated or missing drivers - takes under a minute3Clear out junk files and repair common Windows errorsThe battery drains overnight
Disable parking mode and unplug the camera while diagnosing. Check whether the outlet is always live, verify that ACC and constant wires were not reversed, and inspect the hardwire kit’s cutoff. Test the vehicle battery independently. A dedicated dash-cam battery pack may be preferable, but battery-management or sleep-mode problems warrant professional diagnosis.
The cable causes rattles
Locate the movement rather than simply tightening the cable. Add fabric tape or clips, keep connectors away from loose trim, avoid overstuffing the headliner, and use service loops only where necessary.
When professional installation is the better choice
Hire a qualified dash-cam installer when the vehicle has complex curtain-airbag trim, a liftgate cable that cannot safely pass through the factory boot, difficult fuse access, unusual grounding, or hybrid/electric low-voltage architecture you do not understand. Professional help is also sensible when parking-mode reliability is essential, when the vehicle is leased, or when the installation would require drilling, exposed wiring, or uncertain modifications.
A professional installation does not automatically guarantee warranty coverage. Warranty treatment depends on the product, region, installation method, and cause of any damage. Improper installation damage may be excluded, so use manufacturer-approved accessories and retain the installation documentation.
Quick Recap
Product prices and availability are accurate as of the date/time indicated and are subject to change. Any price and availability information displayed on Amazon at the time of purchase will apply.




