Before driving a newly lifted truck normally, confirm that its fasteners meet the exact kit instructions, the steering and suspension move without binding or contact, brake hoses and ABS wiring have adequate slack through relevant movement, and the front end is aligned to the correct specifications. There is no safe universal torque value, alignment target, or recheck mileage: those depend on the truck and lift kit. Use the instructions for your exact application, and have a qualified technician resolve anything you cannot verify.
What to verify before driving
A lift changes suspension geometry and the space available around tires, wheels, hoses, wires, and other components. A truck can look assembled correctly while still having a line that pulls taut at full steering lock or suspension extension, or hardware that has not been tightened as the kit maker requires. Inspection should therefore cover more than a visual glance at the new parts.
As an Amazon Associate I earn from qualifying purchases.
Use this sequence as a practical framework, not as a substitute for the vehicle and lift-kit instructions:
- Identify the exact application. Confirm the truck’s year, make, model, configuration, and the lift kit’s part number and instructions. Find the specified fastener torques, tightening sequence, alignment requirements, and recheck schedule before inspecting.
- Check the installation and fasteners. Inspect the named components and verify fasteners using the manual’s values and procedure. Follow any instruction about the order of tightening or whether the vehicle’s weight must be on the axle.
- Check steering and clearance. With the truck safely stationary, turn the steering from full left to full right as directed by the kit instructions. Watch for contact, binding, or lines and wires being pulled tight.
- Check routing through relevant suspension travel. Confirm brake hoses and ABS wiring remain secured, clear of moving or hot parts, and adequately slack at the extension points specified for the application.
- Verify brake function and arrange alignment. Do not treat a visual inspection as an alignment check. Follow the kit instructions for brake checks and have the front end aligned to the applicable vehicle and kit specifications.
- Record the required follow-up. Note the kit’s torque recheck and inspection intervals, including any direction to reinspect after off-road use.
If a component is loose, damaged, binding, contacting another part, or routed without adequate slack, stop and have the issue corrected with the appropriate application-specific parts or service before normal driving. Do not improvise a torque value, reroute a safety-critical line casually, or assume an alignment is correct because the truck tracks straight on a short drive.
#1 Best Overall

- Durable Ratchet Head: Made from Hardened treated Chrome Vanadium steel alloy (Cr-V) Corrosion-Retardant: Satin Finish. Made in Taiwan
- Easy Storage: A sturdy plastic storage case is included. Non-Slip Grip: Knurled handle
- Easy to Read: High Contrast & Dual Range Scale. Accurate: Pre-Calibrated to ± 4%
- Accessories included: 1/2" Drive 5" long Extension Bar
- Simple and Reliable: “Click” sound tells the preset torque value is reached. Stop applying force when you hear and feel it.
Find the right instructions and specifications
Start with the instructions for the actual lift kit installed, then consult the vehicle’s applicable service information where the kit instructions call for it. A manual for a similar-looking kit or a different truck is not a reliable source for torque, alignment, hose routing, or maintenance intervals. Even a small difference in model year, drivetrain, suspension configuration, or kit hardware can change what must be checked.
Before beginning, locate the following in the instructions:
- The exact fasteners and components to inspect, their torque values, and the specified tightening sequence.
- Whether any fasteners must be tightened with vehicle weight on the axle or at a particular suspension position.
- Steering, brake-hose, ABS-wire, wheel, tire, and chassis clearance checks, including any points to inspect at suspension extension.
- The required alignment procedure or target specifications for the truck and kit.
- The first torque recheck, subsequent inspection interval, and any additional check required after off-road use.
Have an appropriate torque wrench available if the instructions require a torque verification. A wrench is useful only when paired with the correct value and procedure: applying an invented or borrowed specification can leave a fastener improperly secured. If the instructions are missing, unclear, or do not match the installed parts, contact the kit maker or a qualified installer rather than filling in the gaps from a generic chart.
PC Slower Than It Used to Be?
A free scan shows the junk files, broken settings and background clutter dragging Windows down - then fixes them in one click.Free scan · Windows 10 & 11Outdated Drivers Are Slowing You Down
One free scan finds every outdated or missing driver and matches the right update for your exact hardware.Free scan · exact hardware matchInspect the fasteners and installed components
Use the kit manual’s parts list or installation sequence to identify what was changed. Look for hardware that is absent, visibly displaced, damaged, or not seated as intended, and compare the installation with the instructions. A visual check can reveal an obvious problem, but it cannot confirm that a fastener is at the specified torque. Where the manual calls for torque verification, use its exact values, sequence, and loading condition.
Manufacturer guidance identifies several inspection areas that may be relevant, depending on the truck and kit:
Rank #2
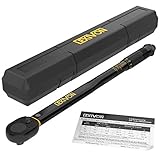
- PRECISE & HIGH QUALITY - Manufactured in Taiwan, our torque wrench is engineered for superior precision. It ships pre-calibrated to +/- 4% accuracy, ensuring dependable results every time. Includes a calibration certificate with a trackable serial number for your assurance.
- DURABLE - Built to last, featuring a reinforced ratchet gear head made from hardened, heat-treated Chrome Vanadium alloy steel for maximum strength and durability.
- LONGEVITY - Protect your investment with our proprietary Electro-Black finish, providing advanced rust and corrosion resistance for extended tool life.
- PERFORMANCE - Easily read and set torque levels with our patent-pending dual-range scale. The high-contrast, yellow-on-black markings are designed for easy visibility, even in low-light conditions.
- OMFORT - Equipped with a reversible ratchet head that drives in both directions and measures torque in a clockwise direction. The ergonomic, knurled handle ensures a non-slip, comfortable grip, reducing hand fatigue.
- Steering: inspect the affected steering connections and components, including tie-rod ends where applicable, for secure installation and proper operation.
- Suspension links and joints: check link arms, bushings, ball joints, and other components named in the kit or vehicle instructions.
- Sway bars: inspect the bars, links, and bushings affected by the installation, if applicable.
- Wheel bearings: include them when specified by the vehicle or kit inspection procedure; do not infer their condition solely from the lift’s appearance.
- Driveline and brakes: inspect affected driveline and brake systems as directed, not just the newly installed lift hardware.
Check the manual for instructions about tightening with the truck’s weight on the axle. That condition can be part of the specified procedure; it is not something to guess at or substitute with a different setup. If you cannot safely reproduce the required condition, have a shop perform the check.
Do not work beneath a truck supported only by a jack. Use the vehicle and equipment makers’ procedures for lifting and support, and do not reach into a pinch point while someone else moves the steering or suspension. If you cannot inspect a component safely, leave that step to a qualified technician.
Cycle the steering and inspect clearances
With the truck stationary and the area around it clear, follow the kit instructions for turning the steering fully left and fully right. Observe the tires and wheels, brake lines, ABS wires, and nearby chassis or suspension parts throughout the sweep. The purpose is to catch interference that may appear only near a steering stop, not merely to see whether the steering wheel turns.
At each end of the sweep, and while moving between ends, check for:
- Tire or wheel contact with suspension, body, or chassis components.
- Brake hoses or ABS wires touching a tire, wheel, sharp edge, moving part, or hot component.
- A hose or wire that becomes taut, pinched, twisted, or trapped as the steering moves.
- Binding, unusual resistance, or another sign that steering components are not moving as intended.
- Routing clips or supports that are loose or positioned differently from the application instructions.
Lines and wires should remain secured and clear of moving or hot parts, with enough slack for the movement specified by the kit maker. A line that looks clear with the wheels pointed straight ahead can still be pulled tight at full lock. If you find contact or tension, do not solve it by bending, stretching, or securing a component wherever it happens to fit. Stop and use the correct routing instructions and application-specific hardware, or have the installer correct it.
Rank #3

- 【9-in-1 Torque Solution】Complete set includes 1/4", 3/8", and 1/2" drive click torque wrenches plus 6 essential adapters (extension bars, universal joint, drive adapters) securely stored in a sturdy portable case.
- 【High Precision & Dual Scales】Factory-calibrated to ±3% accuracy with included certificate; features dual-range scales (1/4": 10-220 in.lb, 3/8": 5-45 ft.lb, 1/2": 10-170 ft.lb) for versatile application coverage.
- 【Clear & Safe Audible Click】Upgraded loud "Click" sound provides a distinct, reliable signal (strong over 5 N.m, subtle under) when preset torque is reached, preventing overtightening and ensuring safety.
- 【Smooth 72-Tooth Ratchet & Quick Release】Reversible 72-tooth ratchet head offers a low 5° arc swing for use in tight spaces and smooth operation in both directions. Quick-release button ensures secure socket changes.
- 【Durable Construction & Wide Use】Hardened Cr-V steel ratchet heads and phosphated adapters resist wear; aerospace aluminum handles ensure lightweight strength and corrosion resistance. Ideal for precise torque on bikes, motorcycles, cars, trucks, wheels, and industrial applications. Backed by 24-month support.
Check brake hoses and ABS wiring through suspension movement
Steering movement is only one part of the check. Suspension travel can change the distance between connection points, so a hose or wire that has slack while the truck is parked may become taut as the suspension extends. The kit instructions determine which positions and routing points apply to the truck.
The Tool Desk
Outbyte Driver Updater FREEScan for outdated or missing drivers - takes under a minuteDriver Scan →Outbyte PC Repair FREERepair Windows errors before they cause bigger problemsFix Now →Where the instructions call for an extension check, verify that the rear brake hoses have adequate slack at full extension. Check other brake-hose and ABS-wire routing through the relevant movement specified for that application. The line or wire should not be stretched, pinched, snagged, or routed against a moving or hot part. Do not assume that a check on one axle, or at one steering position, covers a different axle or movement condition.
Some checks require safely supporting or positioning the truck so the suspension reaches the prescribed point. Do not try to create suspension extension by using an unsafe lift or by placing yourself near a loaded component. If the required procedure or equipment is beyond your experience, ask a qualified shop to perform it.
If slack is inadequate, treat it as a correction needed before normal use, not as a cosmetic concern. The proper fix may depend on the kit and vehicle application; use the specified parts and routing rather than a generic extension or improvised attachment. The instructions should establish what is appropriate. If they do not, ask the kit manufacturer or installer.
Check brakes and arrange the front-end alignment
Follow the kit and vehicle instructions for checking brake operation after installation. Inspect the brake system for issues identified by those instructions, including hose routing and any affected connections. A visual hose check cannot establish that the brakes are functioning correctly, and a short drive is not a substitute for the specified inspection.
Rank #4

- 【8-in-1 Torque Wrench Set】 Includes 1/4, 3/8, 1/2 inch drive torque wrenches that meet your different needs. 5Pcs Adapter: 1/4"Extension bar(4''), 3/8"Extension bar(6''), 1/2"Extension bar(5''), 3/8" Universal Joint, 1/2" to 3/8" Adapter with a sturdy plastic case for storage and portability
- 【Dual range scale & High Precision】 1/4 inch 10-230in.lb/1.1-26.0Nm with 1 in.lb micro-adjustment, 3/8 inch 5-50ft.lb/6.8-67.8Nm with 0.25 ft.lb micro-adjustment, 1/2 inch 10-180ft.lb/13.6-244.1Nm with 1 ft. lb micro-adjustment. Each wrench undergoes strict and specialized instrument testing before leaving the factory to ensure accuracy within ±3% and is provided with a formal calibration certificate
- 【Safe & Reliable】 This torque wrench set has been upgraded to have a louder "Click" sound, ensuring a clear and stronger click sound when the torque value exceeds 5 Nm, subtler click at lower than 5 Nm. The distinct click sound indicates that the preset torque has been reached, signaling you to stop applying force
- 【Releasable & Dual Direction】These torque wrenches has a quick release button with which accessories can easily be installed and removed, the accessories can grip and is not easy to fall down. With 72-tooth reversible ratchet head, it can be used in both clockwise and counterclockwise directions
- 【High Quality and Durable】 The torque wrench ratchet head is made from hardened treated Cr-Mo Steel for longevity. Handle crafted from high-grade aerospace aluminum for durability, and corrosion resistance. All adapters are treated with phosphating, with stronger wear resistance and a longer lifespan
The cited manufacturer instructions call for a complete front-end alignment after installation. Have it performed to specifications applicable to the exact truck and lift kit. Do not copy alignment numbers from another vehicle, another kit, or an online post that does not establish the same application. The relevant instructions may provide or direct the technician to the correct targets.
Alignment is a separate task from checking that steering parts are secure and clear. A truck that appears to travel straight does not prove that its alignment meets the applicable specifications. Give the alignment shop the lift-kit information and ask that it use the correct application data. If the required specifications are unavailable or the shop cannot confirm the application, resolve that before treating the alignment as complete.
Independent reader supportYour contribution helps us test, update, and keep practical guides available for everyone.Use the kit’s recheck schedule—not a universal mileage rule
Post-installation recheck intervals differ among instructions. For example, Superlift’s FORM#40042-02_10242019 instructions, dated October 24, 2019, say to check bolts and nuts after the first 100 miles and every 1,000 miles, and call for professional inspection of steering, suspension, driveline, and alignment at least every 3,000 miles. Those figures apply to that particular instruction set and application; they are not a general schedule for all lifted trucks.
ReadyLift instructions provide a different example: they call for a torque recheck after 500 miles and periodically at service intervals. The applicable ReadyLift manual determines whether that direction applies to a particular installation. These schedules should not be combined or averaged. Follow the instructions for the kit actually installed, along with the vehicle’s maintenance schedule.
Some instructions also call for hardware checks after off-road use. If yours do, include that condition in the maintenance plan. Keep a simple record of the date and mileage of each required check, what the manual requires, and whether a shop completed it. A record helps you follow the actual schedule without relying on memory or importing an interval from a different kit.
Best Value

- ±3% HIGH PRECISION AND COOL APPEARANCE: 1/2 inch drive torque wrench (10-170ft.-lb/13.6-230.5Nm)has a calibration error range of ±3%, high precision, and comes with a corresponding serial number, which is easy to trace the original data, and you can use it with confidence.Hairich torque wrench not only has superior quality but also has a superior appearance. The classic combination of black and red is fashionable and textured, allowing you to enjoy a visual feast during use.
- PREMIUM MATERIAL AND DURABLE: Experience the ultimate durability and antiskid with the torque wrench. The main body of Hairich torque wrench set is made of chrome vanadium steel alloy, which is more strong and more durable. The head of the inch-pound torque wrench adopts a ratchet design with a reversing device to improve work efficiency. The square knurled handle is made of aluminum titanium alloy, which is ergonomic and comfortable to hold for long-time use.
- DUAL SCALE AND QUICK SETTING: Laser Printed by dual-range(ft-lb and Nm). Our professional torque wrench is easy to read and provides direct unit conversion, When the set torque value is reached, the torque wrench will make an audible and felt click to remind you to stop applying force. Pull down the lock knob and hold it until the torque setting is completed. Release the hand, and the lock knob will automatically rebound back to lock the value.
- ERGONOMIC DESIGN AND POWERFUL: Every design of our industrial torque wrench conforms to ergonomic, easy to handle.72-tooth ratchet, 5° ratcheting arc head, a quick-release button for easy loading and unloading, and an aluminum non-slip handle for excellent grip and control. A recent research review that, 72-tooth ratchets are very professional tooth ratchets, you just only rotate 5 degrees to finish it. Not easy to slip and wear, can be used in small spaces, and is more durable and powerful.
- EASY OPERATION AND SAFETY: Thanks to its bidirectional drive ratchet head, our torque wrench can be measured both clockwise and counterclockwise. When the set torque value is reached, a "click" sound will remind you to stop applying force to prevent damage to the item due to excessive torque. Notice: At low Nm settings under 5 Nm the "click" sound can be too light to hear.
When to stop and get a technician involved
A capable owner can perform some safe visual and functional checks, but the sources do not establish one universal boundary between DIY work and shop work. The right boundary depends on the inspection procedure, tools, access, and your ability to identify the correct application data. Use a qualified technician when a step requires equipment or expertise you do not have.
Stop and arrange a correction or professional inspection if you find:
- A fastener that is missing, visibly displaced, damaged, or cannot be verified to the required specification.
- Steering binding, interference, or contact at any point in the prescribed steering sweep.
- A brake hose or ABS wire that is stretched, pinched, damaged, unsecured, or short of slack at the specified steering or suspension position.
- A brake or driveline concern, or a suspension or steering component that does not operate as intended.
- Instructions that do not match the truck or installed kit, or missing values needed to complete a required check.
- An alignment that has not been completed to the correct application specifications.
ReadyLift warns in its installation instructions that increasing vehicle height raises the center of gravity and can affect stability and control. That warning is a reason to take the installation checks seriously, not a measurement of how a particular truck will handle. If the truck feels unstable or behaves unexpectedly after installation, avoid normal driving and have it inspected.
What’s actually slowing this PC down?
Pick the symptom - the matching free tool is one click away.
A practical inspection record
Use a record that refers to the actual instructions, rather than a generic checklist that could imply all kits share the same requirements. For each item, note the relevant manual section or specification and mark whether it was checked, corrected, or referred to a technician.
- Truck identification and lift-kit part number.
- Manual revision or date used for the installation check.
- Fasteners and components the manual requires you to verify, including torque checks performed to its procedure.
- Steering-sweep findings at full left, full right, and any additional positions directed by the instructions.
- Brake-hose and ABS-wire routing and slack at the prescribed steering and suspension positions.
- Brake-system and driveline checks required for the application.
- Alignment date and confirmation that the correct truck-and-kit specifications were used.
- Next required recheck mileage or service point, plus any off-road inspection requirement.
This record does not replace an inspection or authorize driving with an unresolved concern. It makes the kit-specific follow-up requirements visible to the owner and any technician who services the truck.
Quick Recap
Product prices and availability are accurate as of the date/time indicated and are subject to change. Any price and availability information displayed on Amazon at the time of purchase will apply.




