You can adjust reverse-camera lines only if your vehicle or camera system provides that control. Some systems let you switch guide lines on or off; others document controls for moving the overlay. Identify the camera and check the manual for your exact model and year before changing anything.
First, find out what your camera’s controls actually do
Start by identifying whether the camera is factory-installed or aftermarket, then consult the owner’s manual or the camera maker’s instructions for that specific system. A multimedia-screen setting may only add or remove guide lines; it does not necessarily let you reposition them.
Renault’s Trafic manual describes fixed or moving guide lines and says that, depending on the vehicle, they can be added or removed from the multimedia screen. Renault’s Duster manual likewise distinguishes mobile trajectory guides from fixed distance guides and describes adding or removing lines on applicable configurations. Neither example establishes a universal menu path or a general drag-to-reposition control. See the Trafic manual and the Duster manual for those model-specific descriptions.
When can you move the lines?
Repositioning is possible only on systems whose instructions explicitly document an adjustment feature. Garmin’s BC 35 wireless backup camera is one example: its manual explains how to align the guidance overlay separately for each backup camera. That procedure is specific to the BC 35, not a universal method for factory or aftermarket cameras.
Quick wins for a faster PC:
Scan for outdated or missing drivers - takes under a minuteDriver Scan →Clear out junk files and repair common Windows errorsFree Scan →Fix the driver behind crashes, sound loss and screen glitchesFind Drivers →#1 Best Overall

- Versatile 10-in-1 camera tool set: with this indispensable 10-in-1 folding tool set with 6 types of Allen keys (2.0, 2.5, 3, 4, 5, 3/16) and 4 screwdrivers (Torx T25, Phillips, SL7 and slotted), you are always equipped for minor repairs. Ideal for tightening and loosening screws and performing DIY repairs to camera cages, phone cages, top handles, side handles, tripod heads or quick release plates
- Foldable design in pocket size: weighing only 2.6 ounces/74 g, this camera multi-tool with its foldable design of 3.4 x 1.1 x 0.4 inches/85.6 x 27.3 x 11 mm ensures free and easy access to the eight fold-out tools whenever you need them. Fits easily in a pocket. Also includes a high quality storage/travel bag
- 360° Adjustable Angle: The 360° adjustable fold-out tools can be adjusted to the perfect angle, and the tool tray also serves as a handle for more precise torque to tighten screws as needed. Two additional screw slots on the rack help adjust the tightness of the rotation to your liking
- Designed for durability: Made of anodised aluminium alloy and stainless steel. These high-precision CNC machined tools ensure compliance with exact specifications, withstand frequent use and are scratch resistant, for more effective, durable and reliable use over time
- Package contents: 1 x 10 in 1 folding screwdriver tool set (2.0, 2.5, 3, 4, 5, 3/16 L shaped hex keys, Torx T25, Phillips, SL7 and slotted screwdriver), 1 x storage bag
How to align guides on a Garmin BC 35
- Choose a clear reference. Park beside a visible curb, driveway edge, or parking-stall line, as Garmin recommends.
- Open the camera’s guide-line adjustment controls. Follow the BC 35 instructions for your compatible setup; do not assume another camera uses the same controls.
- Drag the circles at the overlay’s corners. Align the guides with the reference and the vehicle as directed in the Garmin BC 35 manual.
- Check the result from the camera view. Garmin says the guides should reflect the vehicle’s outside edges, with the red section aligned with the rear of the vehicle.
- Repeat for each camera. Garmin instructs users to align the lines separately for each backup camera in the system.
Those reference points and alignment goals come from Garmin’s BC 35 instructions. Do not apply a universal measurement or substitute another system’s procedure.
How factory settings differ from movable overlays
| System example | What the documentation establishes | What it does not establish |
|---|---|---|
| Renault Trafic, depending on vehicle configuration | Guide lines may be fixed or moving; applicable configurations can add or remove them from the multimedia screen. | A general control for repositioning the overlay. |
| Renault Duster, applicable configurations | The manual distinguishes mobile trajectory guides from fixed distance guides and describes adding or removing lines from the multimedia screen. | That every configuration offers the same controls or a drag-to-reposition feature. |
| Garmin BC 35 | The manual documents aligning and repositioning guides with corner controls, using a visible reference. | That other aftermarket cameras use this procedure or offer adjustable guides. |
If the lines look wrong but there is no adjustment control
- Check the exact vehicle and camera manual for a line-display or calibration setting; a display toggle is not proof that the lines can be moved.
- Confirm the camera view is unobstructed and compare the overlay with the vehicle’s position from a safe, stationary setup.
- If the manual does not document repositioning, do not guess at menu options or assume a universal scan-tool procedure. Ask the vehicle dealer or camera installer about that specific system.
Use the lines as a guide, not a guarantee
Renault’s Trafic manual cautions: “This function is an additional aid. It cannot, therefore, under any circumstances replace the vigilance or the responsibility of the driver.” Check the area behind the vehicle directly and use mirrors and other safe checks; do not rely on the camera overlay alone.
Quick Recap
Best Value
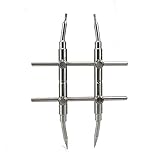
- This Lens Wrench tool is all made of stainless steel (including screws), which is durable and does not rust.
- Curved design: after tightening the screw hole more firmly, it will not slip or damage the lens.
- It can be detached 25mm Lens to 120mm Lens. Suitable for prisms for surveying and mapping, microscopes, bird watching mirrors, etc.
- The double-head design, one end is flat and the other is pointed, which is easy to use.
- The screw is bigger, the operation is more convenient, and it is easier to tighten the crossbar.
Rank #4

- Durable: Made of stainless steel (including screws), durable and anti-rust.
- Curved Design: Tighten the screw holes more firmly and will not slip or damage the lens.
- Fit: It can separate 25mm lens to 120mm lens. Suitable for prisms for surveying and mapping, microscopes, bird watching scopes, etc.
- Double-Ended Design: One end flat, one end pointed, easy to use.
- Easy to Operate: Larger screws for easier handling and easier tightening of crossbars.
Rank #3
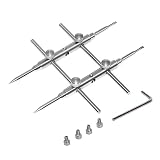
- Lens kit,points and flat tips. Made of high quality anti-magnetic stainless steel, pretty and durable. Adjustable aperture from 10mm to 100mm, meet the needs of most lens sizes.
- For lens repair or large format lens retaining ring tighten and loosen easily.
- More screw holes design makes the cross bar more flexible for adjustment.
- Extended head design is available for some two lens graphics camera, depends on the avatar sizes of your TLR cameras
- Launched by eTone-US.
Rank #2
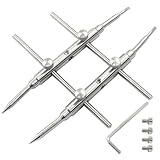
- What You Will Get: Each pack includes a spanner opening tool, 4 hex screws, 1 hex wrench, also includes 4 protective caps to avoid accidental scratches on the skin, lens, or bag caused by the pointed and flat tips
- Adjustable Width: The spanner wrench is made up of two straight arms and two straight rails and can be securely assembled using the included screw sets for stable and rigid operation.
- Exquisite Design: The curved tip fits perfectly for convex lens with curved or slanted retaining ring. Adjustable opening from 10 to 100 mm meets the need of most lens size, use them to tighten the spanner opening tool.
- Double-Ended Design: Our lens spanner features both pointed tips and flat tips to fit standard hole notches and slotted notches on lens retaining rings respectively. Easy to use for different types of lenses. Adjustable from 10-100mm
- Adjustable Depth: Spanner depth can be adjusted by the 3 screw holes, makes it easier to disassemble components deep in the housing of a lens
Product prices and availability are accurate as of the date/time indicated and are subject to change. Any price and availability information displayed on Amazon at the time of purchase will apply.




