What’s actually slowing this PC down?
Pick the symptom - the matching free tool is one click away.
First determine what you need to remove: the mirror assembly may detach from a small button that stays bonded to the windshield, or you may need to remove the button itself from the glass. These are different jobs. Mirror-release methods vary by vehicle; for a button bonded to the windshield, do not pry, heat, or use solvents as a general-purpose removal method.
Identify which part you mean by “button”
The mounting button is the small piece bonded to the inside of the windshield. The mirror assembly attaches to it. If you only need the mirror out of the way, release the mirror from the button and leave the button on the glass. Removing the bonded button is a separate glass-repair task.
- Mirror assembly: comes off the mount using the vehicle’s release mechanism.
- Windshield button: remains attached to the glass unless it is separately removed or has already detached.
Remove the mirror assembly from the button
- Check the vehicle-specific service procedure. Inspect the mount for a set screw, clip, or other release, but do not assume the mechanism based on another vehicle.
- Release the mirror as specified. A Tesla Model S service manual gives a model-specific example: carefully turn the mirror assembly counterclockwise to release it from the windshield mount. That direction is not a universal instruction for other vehicles. See the Tesla Model S service procedure.
If the assembly does not release as the vehicle procedure describes, stop rather than forcing it; the mount may use a different design or release method.
Remove a button that is still bonded to the windshield
Do not treat the bonded button like the removable mirror assembly. A 2009 Dodge Journey service procedure describes the button as permanently bonded to the inside of the windshield, and the available vehicle-specific information does not establish one safe extraction method for all cars. Permatex’s Professional Strength Rearview Mirror Adhesive instructions state: “Solvents, heat and leverage are not recommended for removal.”
Recommended Free Tools
#1 Best Overall

- Direct replacement - this interior rear view mirror mounting base matches the fit and function of the original equipment mounting base
- Durable construction - this part is made of quality materials to ensure a solid, secure mount
- Cost-effective solution - replace only the missing or damaged mount, not the entire mirror
- Quality tested - this part has undergone try-on testing to ensure a quality fit
- Backed by team of engineers and quality control specialists in the United States
If the button itself must come off, consult the service procedure for the exact vehicle or ask an automotive-glass professional. Avoid improvising with force, heat, or solvent; the cited manufacturer warning does not provide an alternative universal extraction technique.
Independent reader supportYour contribution helps us test, update, and keep practical guides available for everyone.Reattach a button that has already detached
If the button has come off and your goal is to bond it back on, use an automotive rearview-mirror adhesive kit and follow that kit’s directions exactly. These products are for reattachment, not for extracting a button that remains bonded to the windshield.
Rank #2

- Professional-Grade Quality: This rear view mirror adhesive repair kit creates a lasting bond that permanently secures mirror buttons to windshields
- Fast-Curing & Easy Application: Simply apply the activator and adhesive. The activator enhances the bond's effectiveness. Achieves handling strength in seconds, and mirror mounting strength in 30 minutes
- Multi-Surface Versatility: Bonds Metal to Glass, Metal to Metal, and Glass to Glass. The car mirror glue’s versatility ensures it can be used across various materials without sacrificing performance
- Waterproof & Pressure Resistant: This Fast-curing windshield glue provides long-lasting protection against moisture and external forces
- Permanent Bonding Power: Trusted by professionals for its superior bonding capabilities, delivering consistent and reliable results in both high and low temperatures
- Permatex’s instructions call for scraping old adhesive from the button and windshield glass, and warn against solvents, heat, and leverage for removal. See the Permatex instructions.
- 3M’s instructions describe cleaning the button and glass, applying primer, allowing it to dry, and observing the product’s stated set time. See 3M Rearview Mirror Adhesive instructions.
Preparation and cure directions differ by product. Do not combine steps or set times from different kits.
Quick Recap
Best Value
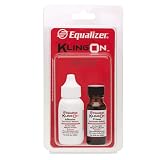
- KLINGON REARVIEW MIRROR ADHESIVE
- The Equalizer KlingOn Rearview Mirror Adhesive Kit includes enough material to adhere up to 200 mirror buttons.
- Unlike most brands, ours features a brush-on primer instead of a spray.
- The adhesive has a gel-like consistency, preventing it from running down the windshield.
Rank #4
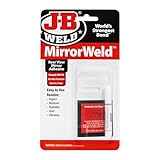
- J-B Weld MirrorWeld: a specially formulated rear view mirror adhesive that includes an accelerator and an adhesive. MirrorWeld can be used to install new mirrors or re-attach mirrors that have fallen.
- Set and Cure Time: Sets in 1 minute and cures in 1 hour.
Rank #3

- 2 part (towlette and pipette) professional strength rearview mirror adhesive and activator
- Medical grade towelette helps to minimize application messes, improves application accuracy
- Suggested Applications: mounting rearview mirrors to windshields
- 2 part kit: .01 oz. adhesive vial and .02 oz. activator towelette
- Incorporates professional strength OEM specified formula for guaranteed results
Product prices and availability are accurate as of the date/time indicated and are subject to change. Any price and availability information displayed on Amazon at the time of purchase will apply.




